Maintain Bill Entity Time Rates
The Billing Entity Time Rate routine allows the user to enter Time Rate information (the amount to be charged hourly for each time activity) for specific Billing Entities. Time Rates for the same Billing Entity and for the same Time Code or Activity may vary from Timekeeper to Timekeeper (i.e. for the specified activity, the current Timekeeper will charge $X/hr to the current Billing Entity). In eQuinox, Billing Entities are those people who may or may not be Clients, but who are responsible for the Bill for a particular Client (i.e. Billing Parties).
When the Billing Entity Time Rate routine is accessed from the eQuinox main menu, the screen shown below will be displayed.
Field Definition

Billing Entity - The unique identifier and name of the Billing Entity. To view or enter information for a specific Billing Entity, the user may execute a query based on that Billing Entity; to view all Billing Entities, the user may simply execute a query without restrictions. The information displayed in the rest of the screen is specific to the Billing Entity selected in this section.
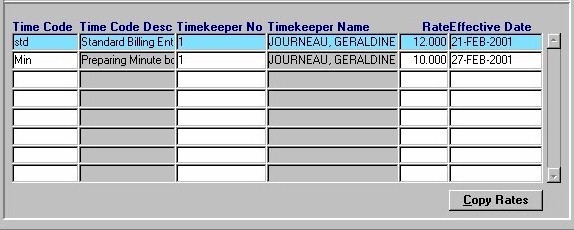
Time Code, Time Code Desc - The Code and Description of a Timekeeper's activities associated with the current Billing Entity and the corresponding Matter. A selection may be made from the List of Values provided.
Timekeeper No, Timekeeper Name - The Number (unique identifier) and Name of the Timekeeper performing the activities indicated in the Time Code fields (i.e. for the specified activity, the current Timekeeper will charge $X/hr to the current Billing Entity). A selection may be made from the List of Values provided.
Rate - The hourly rate being charged to the Billing Entity for the specified activity by the specified Timekeeper. For precision, the rate goes to three places after the decimal.
Effective Date - The date on which the rate being charged for the specified activity became effective, or was last edited. A date selection may be made from the Calendar provided.
Copy Rates - To copy rates for a specific Time Code from the current Bill entity to another Bill Entity, or to copy rates for the current Bill Entity from one Time Code to another, the user must click the Copy Rates button. They will be presented with the Copy From screen, as seen below.
The Copy From Screen
The screen seen below appears when the user clicks the Copy Rate button on the main Maintaining Bill Entity Time Rates screen.
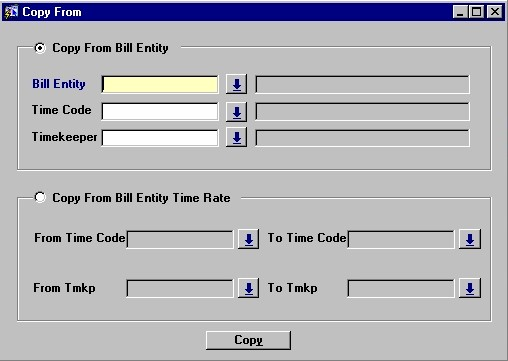
Copy From Bill Entity - To copy rates for a specific Time Code from another Bill Entity, the user must select this option.
Bill Entity - The unique identifier and name of the Bill Entity from which rates are being copied. A selection may be made from the List of Values provided.
Time Code - The unique identifier and name of the Time Code for which rates are being copied. A selection may be made from the List of Values provided.
Timekeeper - The unique identifier and name of the Timekeeper associated with the Time Code for which rates are being copied (i.e. when this Timekeeper encounters this Time Code on behalf of the Billing Entity, the rate being copied will be charged for each instance). A selection may be made from the List of Values provided.
Copy From Bill Entity Time Rate - To copy rates from one Time Code to another for the current Bill Entity the user must select this option.
From Time Code, To Time Code - The unique identifier of the Time Code from which rates are being copied, and the unique identifier of the Time Code to which rates are being copied. Selections may be made from the Lists of Values provided.
From Timekeeper, To Timekeeper - The unique identifier of the Timekeeper from which rates for the specified Time Code are being copied, and the unique identifier of the Timekeeper to which rates for the specified Time Code are being copied (i.e. when this Timekeeper encounters this Time Code on behalf of the Billing Entity, the rate being copied will be charged for each instance). Selections may be made from the Lists of Values provided.
Copy - When the user has finished making their selections, they must click the Copy button to complete the copying process.
Once the user has finished entering or updating information, they must click the Save button or press F10 to commit the changes to the database.